A highly scalable solution for data replication using Amazon FSx for NetApp ONTAP and NetApp SnapMirror
On premises customers using NetApp storage arrays in their own data centers often have strict network and firewall access control rules in place to secure their data, but this type of security usually introduces Network Address Translation (NAT) into the path between the arrays. ONTAP, either on-premises or in the cloud, requires storage clusters to be configured with static IP addresses, and the SnapMirror™ protocol that is used to replicate data between them doesn’t support NAT between them. This prevents connectivity between FSx for NetApp ONTAP and on-premises NetApp instances that are behind firewalls performing NAT. Users in environments like these cannot easily migrate data between their on-premises environments and Amazon FSx for NetApp ONTAP. Ideally, they would choose to connect via SnapMirror over the public internet, but this would be impossible in a default configuration.
NetApp SnapMirror™ is a commonly used DR, backup, and replication feature of NetApp ONTAP storage, both on-premises and in the cloud. Amazon FSx for NetApp ONTAP includes SnapMirror as part of a fully managed service within AWS. However, since NetApp SnapMirror doesn’t support NAT, and these IPs are verified against the file systems being peered, then an Amazon Elastic Compute Cloud (Amazon EC2) based NAT device fronted with Elastic IPs needs to be deployed to make the L3 headers match between each file system and the internet.
In this post we discuss an architecture and design to streamline and scale this migration challenge in an AWS environment. Another option would have been setting up individual VPN tunnels between the data centers and AWS. However, this would have been challenging to manage at scale. The reason NetApp SnapMirror doesn’t support NAT is because the metadata exchanged during peering, such as Logical Interface (LIF) IPs, are verified against the file systems being peered. If they don’t match, then the connection fails. Given this information, we can say that NAT doesn’t break SnapMirror, but this changing of IPs does. So, what if we can NAT the connections in a way that SnapMirror can still verify those IPs? We just need to make sure that the L3 Headers on the IP packets match, and the most flexible way to do this is with a second NAT.
Solution overview
To make the L3 headers match, we need an NAT device between each file system and the internet. This device can be a Linux instance, firewall, router, or other NAT capable device within your data center, with the appropriate bandwidth. In this post, we deploy a Graviton network optimized EC2 instance in our Amazon Virtual Private Cloud (Amazon VPC). We use a c7gn.medium instance with a 3.5 GB/s network throughput. This instance size can be scaled based on your bandwidth requirements. Given that we have very minimal CPU and memory requirements, this gives us the best network throughput for the cost at the time of this writing.
Prerequisites
The following prerequisites are necessary to complete this solution:
- An NAT device that SnapMirror passes through at each filer
- A unique subnet for every file system
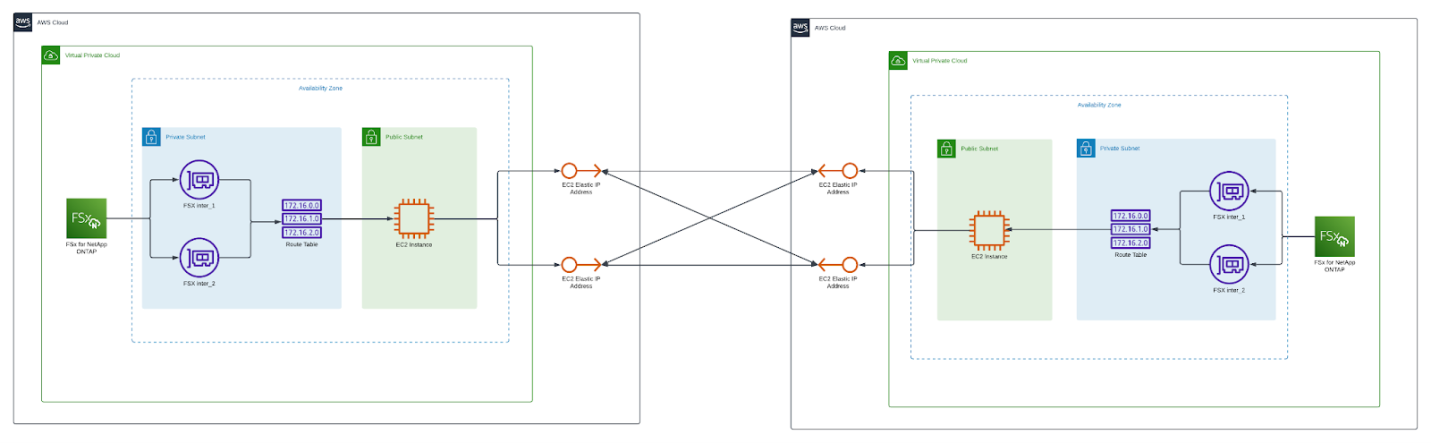
AWS architectural diagram showing two VPCs connected through a self-managed Linux based NAT gateway
Example
The example configuration goes from AWS to AWS for the sake of directness, as shown in the preceding figure, but either side can be replaced with any NAT device that does similar work. Similarly, the example is based on a Single-Availability Zone (AZ) FSx for ONTAP file system. If you’re using a Multi-AZ file system, then we recommend deploying two Amazon EC2 instances in each of the Multi-AZ file system’s AZs and routing traffic through the instance in each AZ.
EIPs
In our example we use one EIP for each FSx for ONTAP inter-cluster interface. To start we immediately request four EIPs not associated with anything yet. Using some port allocations could allow for less IPs to be used, but that is outside the scope of this example.
Security group
Having EIPs connected directly to Amazon EC2 without restrictions is bad posture. Therefore, we created a security group in each VPC and specified all traffic from all four EIPs as allowed. Technically, only TCP 10000, 11104, 11105, and ICMP are necessary, but our router only forwards these ports.The following summarizes the example network configuration for the two FSx for ONTAP deployments. The following IP addresses are for example purposes only, and the values differ in your environment based on your network configurations.
Side A:
VPC: 10.1.0.0/16FSx ONTAP inter-cluster endpoint 1: 10.1.0.137FSx ONTAP inter-cluster endpoint 2: 10.1.0.125inter_1 EIP: 18.190.143.162inter_2 EIP: 3.128.12.212
Side B:
VPC: 10.2.0.0/16FSx ONTAP inter-cluster endpoint 1: 10.2.0.155FSx ONTAP inter-cluster endpoint 2: 10.2.0.110inter_1 EIP: 3.135.134.67inter_2 EIP: 3.146.166.253
Amazon EC2
To handle the NATs, deploy an EC2 instance with RedHat 9 with our previously created security group attached. RedHat isn’t necessary, and any Linux distribution that supports nftables should work for this exercise. For each of the EC2 instances, we need to bind two of our EIPs. Each of these EIPs must be associated with different private IPs. Finally, we must disable source/dest check on the network interface. This allows our Amazon EC2 to send packets sourced from IP addresses that it doesn’t own.
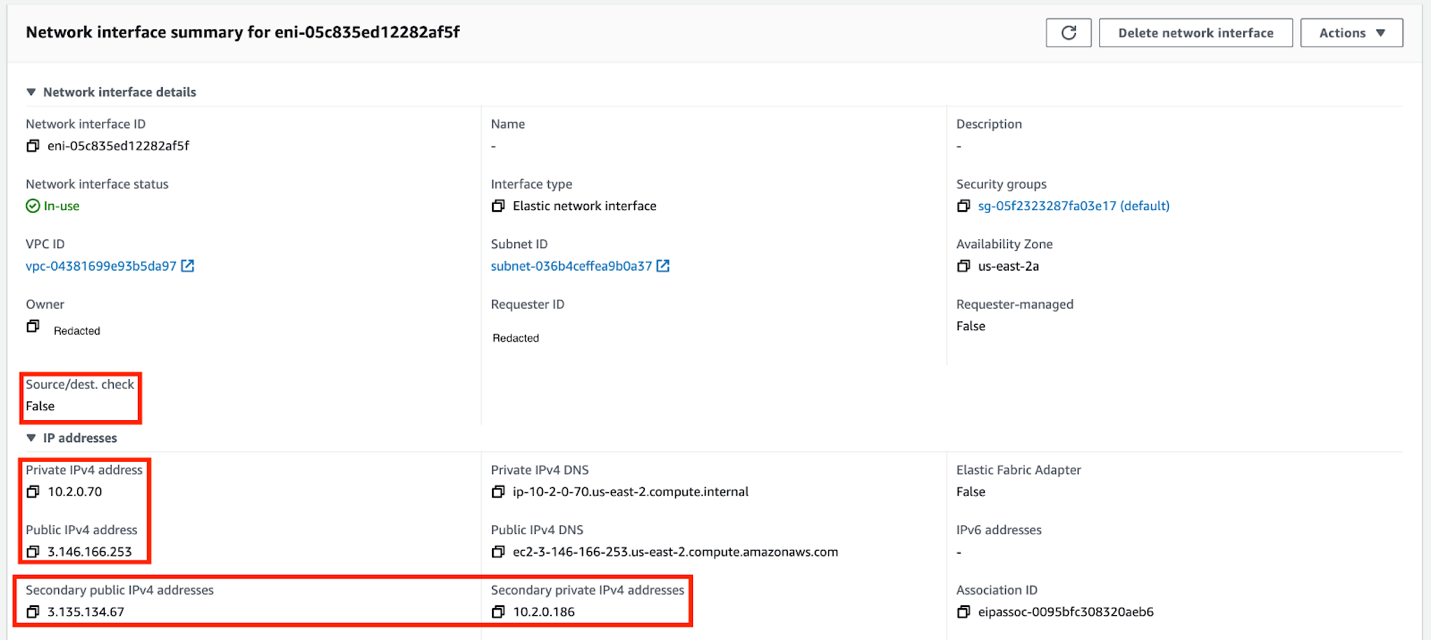
Screenshot of the network summary page of an EC2 instance with the private and public IP addresses highlighted
nftables
On each of these Linux instances we must add some nftables rules to handle the connections. This creates a 1:1 mapping between the FSx for ONTAP cluster interfaces and an EIP. For our example environment, the nftables config for Side B would be as follows.
Option 1: Edit the nftables file natively
Option 2: nftables CLI config script
Route tables
With both routers configured we need to make sure that SnapMirror traffic passes through them. To do this, we update the route table associated with FSx for ONTAP to send traffic from our remote VPCs to the network interface of our EC2 instances. For example, on Side B we add a route pointing 10.1.0.0/16 to the Elastic Network Interface of our EC2 instance. On side A we would do the inverse: 10.2.0.0/16 to its EC2 instance.

Route table associated with FSx for ONTAP
FSx for ONTAP security group
As the last part of setup, we must allow connection from our remote VPC network to connect to our FSx for ONTAP interfaces. For this we added 10.0.0.0/8 to the security group on both FSx for ONTAP instances.
Peer the file systems
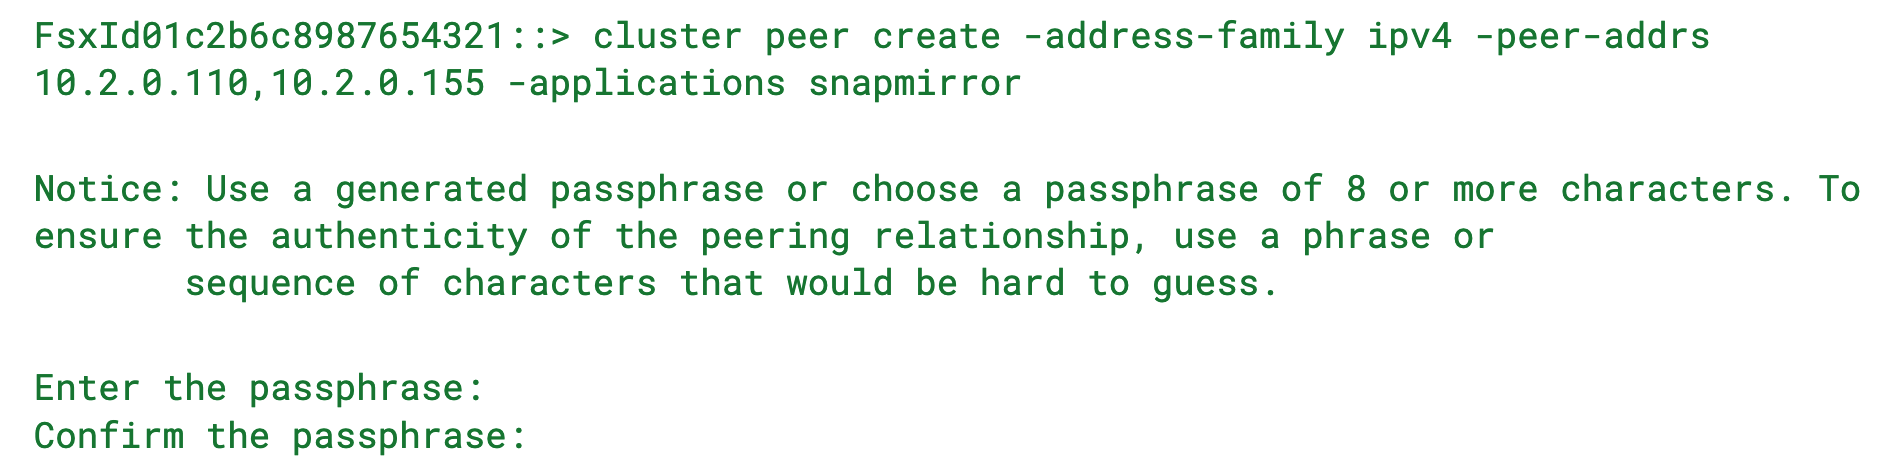
With the network connections in place, all that’s left is to peer the FSx for ONTAP file systems. First, we log in to Side A and start the peering request.

Then, we log in to the Side B option and execute the same command without the generate passphrase and using the IPs from Side A. From the Side B of the FSx for ONTAP file system.
From here the SVMs can be peered and a SnapMirror relationship can be created.
Cleaning up
There are costs associated with running EC2 instances and FSx for ONTAP file systems. Remember to delete and terminate these resources if they are no longer necessary. To delete a file system, follow the instructions in the FSx for NetApp ONTAP user guide. To terminate your EC2 instances, go to Terminate Your Instance in the Amazon EC2 user guide.
Conclusion
In this post, we outlined the highly reliable and scalable solution design to replicate data using Amazon FSx for NetApp ONTAP and SnapMirror over the internet and enable users to have connectivity between any ONTAP instance to any other ONTAP instance with the firewall rules in between. We also discussed the steps to deploy the configurations as well as scripts to automate the setup and deployment of the solution.
If you have more questions, then feel free to leave a comment or read the FSx for ONTAP FAQs.